H3: Sound Sort
1. Overview
Sort picture cards into piles by their ending sounds. Now that your child has learned some of the ending sounds, she will practice differentiating between multiple ending sounds.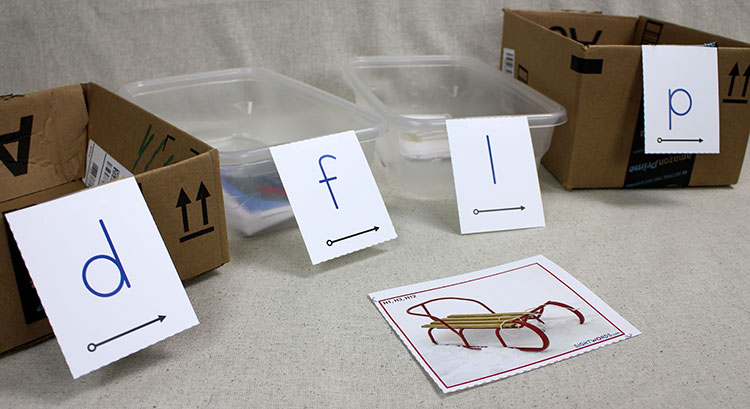
“Sled. Sled-d-d. What sound is at the end of sled?”
2. Materials
- Script
- picture cards and word index
- sound cards for the consonants — you will not need c, h, q or y for this activity
- 4 boxes or bowls (no larger than a shoebox)
3. Activity
Video: How to play Sound Sort
Before you start the game, have your child identify the sound card on the end of each box by saying its sound.
To start the game, tell your child to pick a picture card from the stack. Tell him the name of the picture. Then have him repeat the name, emphasizing its ending sound. He must then give only the ending sound for the picture and decide which box to put the card in.
Adult: Okay, pick a card from the stack. It’s a rock! What is it a picture of? Child: A rock! Adult: What sound is at the end of rock? Listen: rock. Rock-k-k. Child: /k/ Adult: Good. Rock-k-k ends with /k/. Which box should we put it in? Which box has /k/ on the front? Child: Um…that one? Adult: No, that card says /sss/. Which one says /k/? Child: That one. Adult: That’s right. That card says /k/. Rock ends with /k/, so we put it in the /k/ box.Continue this procedure with the remaining picture cards, until all the cards have been sorted into the correct box. The second and later times you do this activity, start by quickly reviewing the ending sounds that were covered previously. Show your child the sound cards and have her say the sound for each one. If her knowledge of any of these previously covered sounds is not solid, cover those sounds in that day’s lesson along with some new sounds. ↑ Top
4. Suggested Schedule
You will do this activity with your child several times to give him practice with all the ending sounds and their corresponding letters. Once he has covered a batch of four ending sounds in the previous activity (Last Things Last), you may use those sounds in this game. Here is a schedule, matched to the schedule for Last Things Last, to show you the order in which to cover each of the ending sounds.| Day | Ending Sounds |
|---|---|
| 1 | m, s, t, v |
| 2 | d, l, f, p |
| 3 | n, g, r, k |
| 4 | b, j, x, w, z |
5. Confidence Builder
If the child struggles with four different ending sounds, use just three or even two ending sounds in a game. Don’t rush through this activity. Your child needs to be strong in her ability to identify ending sounds before she moves on to more advanced activities. ↑ Top6. Extension
Once the child has a firm grasp of this activity, he can complete the game independently. ↑ Top7. Variation
Use pictures from magazines or have the child look around the room and name objects that match one of the ending sound cards on the boxes. ↑ Top8. Small Groups (2-5 children)
Lesson Objective: Children will identify the ending sounds in a variety of picture cards and sort the pictures into one of four containers labelled with the consonant letter card corresponding to each picture’s ending phoneme. GELDS (Georgia Early Learning & Development Standards): CLL6.4a Georgia Standards of Excellence: ELAGSEKRF3.a Common Core State Standards: CCSS.ELA-LITERACY.RF.K.3.A Adaptation: Read the main activity, watch the video, and follow the instructions above, with the following changes: Review what “ending” means. Place the boxes on the table or rug, with children facing the box labels. Review the sound on each letter sound card. Hold several picture cards out like a fan. Ask a child to choose a card, and ask, “What is that a picture of?” (Say the correct name if the child does not know.) Prompt the child with more questions: “What sound comes at the end of that word? Which box does it go into?” Give all the children several opportunities for practice. If you wish to make the activity more engaging, spread out the boxes to different areas in front of the children and have them run to each box with the picture they identify. This becomes a non-competitive “relay race” and allows children more opportunity for movement. Reinforcement: Place the materials in a center for independent practice. Ask the children to tell you when they finish. Check their work for understanding. Use this Reinforcement at Home form to tell parents and guardians how they can reinforce lessons outside the classroom. ↑ TopLeave a Reply